Ribbon Trim / Decor with Ribbon  Making of a Ribbon trim
Step by step to the completion of a decoration with ribbon
Gosh It's Not as easy as it looks to photograph what you do, so I apologise if the photos aren't brilliant, I will write step by step as we go along though and hopefully that will make it a bit clearer, if not I'm sorry and you'll just have to ask me instead.
Pic 1 / Foto 1: 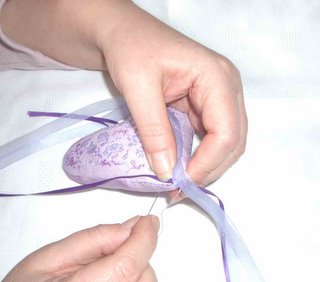 To begin with you need 3 lengths of ribbon, usually I estimate about 2 metre lengths for a small hanging pillow so in total it would be 6 metres if you were doing it in all the same colour ribbon, make sure they are all seperate lengths. Next fasten the 3 lengths of ribbon to the bottom point (in this case is the heart point), I usually slip stitch this together.
Per cominciare avete bisogno di 3 pezzi di nastro, calculation generally about 2 feet for a small cushion and then hung in total should be 6 meters if you want to do everything the same color , provided they are separated into 3 parts. Then attach the 3 pieces of tape at the lowest point of bearing, in this case in the lower tip of the heart, usually I use point "slip stitch" to join them. Pic 2 / Photo 2:  Now here I catch the ribbons with the needle and cotton to pushing the needle through the ribbon thickness.
At this point you move the needle through the entire thickness of tapes overlap.
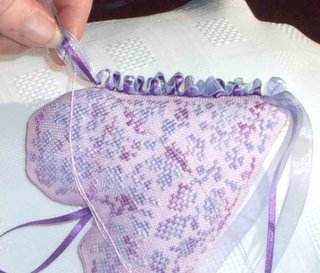
Pic 3 / Photo 3:  Then pull the thread Towards That you know the ribbon ruffles.
Now pull the wire toward you in order to curl the ribbon.
Pic 4-8 / 4-8 Photo:
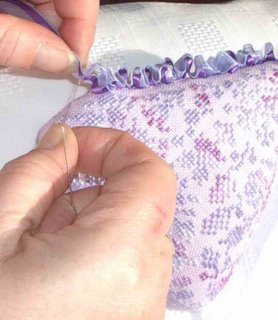
 Then catch the fabric through the seams with this is about you needle 1 / 4 inch intervals as I go along, then catch the ribbon again, this is Usually about 1 inch intervals along the ribbon or However you prefer to close or the size of the ruffles.
 Continue threading the fabric along the seam at intervals of about 6 mm. then again passed through the three overlapping bands posts: the interval in this case depends dall'arricciatura you want: to I usually put them at intervals of 2.5 cm. about.
 You do this all the way around your pillow until you get back to Where You I started Altogether then catch the ribbons and make a slight knot with Them and fasten off, then trim the ribbons to length and You Have the finished project.
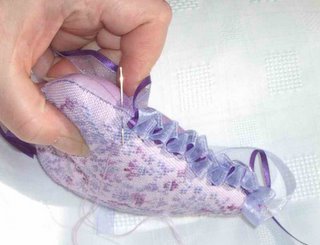 Continue this throughout the length of your bearing, until the king returns starting point. At this point I of I usually tie a knot in the strip light and fixed them . adjust now the length of the strip and the work is finished.
 Particular
This project is for my MIL for Mothers Day, The Heart is a freebie by Anne Les Petites Croix and the thread I used is by Dragonfloss Lasting Friendship, its a lovely varigated thread in LILACS and soft mauves, the fabric is hand dyed 32ct Lively Lilac by Kates Kloths.
Oroginal link: Ribbon trim
lining pillowcase / pillow slip cover Step by step implementation of the lining of the Federal
 Making of the slip cover pillow
MATERIAL (Photo oo)
cushion to cover.
pattern with the right dimensions to the pillow that you want to play. Cloth for
back : cut into smaller abundant canvas embroidery, the length must be longer to fold.
scissors.
Pins.
sewing machine.
 MATERIALS (Pic 00)
Pillow to be covered.
Needlework piece of appropriate size.
Fabric for the back : Bigger Longer and needlework of the piece.
Scissors.
Pins.
Sewing machine.
Photo 1 / Pic 1 :
 First, you fold the bottom of the embroidery, turning back the fabric of the action you want (at least 7 mm.). Stop it with pins and irons with iron.
First of all, make a lapel at the bottom of the stitched piece. Choose how much you prefer the lapel on the back, But It Must Be Almost 7 mm.
Hold it with pins and iron.
Photo 2 / 2 Pic:
 Now take a step with the sewing machine with a wire in the same color of the fabric.
Now, sew the lapel with the sewing machine, using a similar color thread.
Photo 3 / 3 Pic:
 The fabric for the back must understand the internal component, so it must be longer than the embroidery, the extent of implication is proportionate to the size of the cushion cover. Make a first
blemishes the same way at the bottom of the fabric that will serve as the back. Even here, you choose the size, but at least 7 mm. Take a ride in the car.
The back fabric must Provide the inner lapel to hold the pillow, I know it Must Be Longer Than The needlework piece, the measure of the inner lapel is the pillow's shapely size. Make a little lapel
first at the bottom of the backfabric. Choose how much you prefer the lapel on the back, But It Must Be Almost 7 mm. Sew it.
Photo 4 / 4 Pic:
 Take the second aspect, what will the pillow in its place so to speak. As I said, the measure is proportionate to the size of the pillow so you will have the same size on the front of the canvas embroidered on the back and fold the pillow. Sew the edges to keep it move.
Now make the second lapel, it will hold the pillow inside. The Exceed can not measure the size of the needlework piece: You'll Have The Same Size of the front side of the needlework piece, and the lapel on the back side.
Sew the two lateral margins of the lapel.
Photo 5 / 5 Pic:
 Now superimpose, brow to brow, the two fabrics and secure them with pins to prevent them from moving. Sew the three sides except the bottom where you have already done the cuffs.
Place the two fabric, front at the front, and hold with pins. Sew the three sides
EXCLUDING the bottom side WHERE've made the lapels.
Photo 6 / 6 Pic:
 Cut any excess fabric, not to create unsightly swelling.
Cut off the surplus as possible to Avoid lumps.
Photo 7 / 7 Pic:
 Ready to reshoot?
Ready to turn over?
Last Photo 8 / 8 last Pic:
 Here is the finished lining. Irons at the edges to flatten the seam swelling.
The pillow's cover is finished! Ireon it at the margin, to spread the lump of the sewing
DIY Notebook / Linen book  Step by step to the completion of DIY Notebook
  linen book The Making of
MATERIAL (all measurements are width by height)  Cartoons
for an A5 book: 2 cartons of 2 mm. 20x23 cm. a board back from 2 mm. 4x23 cm. 2 cartons of 1 mm. 19.5 x22, 5 cm. a cartoon for the central band of 1 mm. 3.5 x22, 5 cm.
for an A4 book: 2 cases 2 mm. 28x32 cm. a board back from 2mm 7.5 x32 cm. 2 cartons of 1 mm. 27.5 x31, 5 cm. a cartoon for the central band of 1 mm. 7x27, 5 cm.  Lino must be greater than at least 2.5 cm. cartons, each side.
for an A5 book : flax must be 50x28 cm.
for an A4 book : flax must be 70x37 cm. On the right side should run the embroidery: un'imbastitura made to define the space which is the latest funeral, then that is the size of the inner carton, then:
for an A5 book : 20x23 cm.
for an A4 book : 28x32 cm.
fabric for the interior must be greater than at least 2.5 cm. cartons, each side.
for an A5 book : flax must be 50x28 cm.
for an A4 book : flax must be 70x37 cm.
a single sheet wadding for stuffing
for an A5 book : 44x23 cm.
for an A4 book : 63,5 x32 cm.
 are also required (Photo 00): Vinavil blue fabric brush to spread the adhesive tape Paper Scissors Riveter and ring mechanisms
for an A5 book : mechanical 2 rings
for an A4 book mechanism: 4-ring
 MATERIALS (all the sizes are Width x Height, european measurement) Cardboards
for an A5 book : 2 mm. Cardboards 20x23 cm 2. 2 mm. 1 cardboard plugs for the 4x23 cm. 1 mm. 2 Cardboards 19.5 x22, 5 cm. 1 mm. 1 cardboard for the spine 3,5x22,5 cm.
for an A4 book : 2 mm. 2 cardboards 28x32 cm. 2 mm. 1 cardboard for the spine 7,5x32 cm. 1 mm. 2 cardboards 27,5x31,5 cm. 1 mm. 1 cardboard for the spine 7x27,5 cm.
Linen It has to be bigger at least 2,5 cm. for side, than the cardboards
for an A5 book : the needed linen piece is 50x28 cm.
for an A4 book : the needed linen piece is 70x37 cm.  The needlework has to be realized on the right side: make a basting to borde the maximum space you can stitch it (it is the dimensions of the cardboard)
for an A5 book : 20x23 cm.
for an A4 book : 28x32 cm.
Fabric for the inner part It has to be bigger at least 2,5 cm. for side, than the cardboards
for an A5 book : the needed linen piece is 50x28 cm.
for an A4 book : the needed linen piece is 70x37 cm.
Cotton in sheet for the padding
for an A5 book : 44x23 cm.
for an A4 book : 63,5x32 cm.
You need also (Pic 00): Glue for fabric Brush, to spread the glue Paper adhesive tape
Scissors Riveter e Ring machinery
for an A5 book : machinery with 2 rings
for an A4 book : machinery with 4 rings
Realizzazione di un quaderno A5 / Making of an A5 linen book Foto 1-2 / Pic 1-2 :


In the pictures you can see the embroidered on the cover and basting that marks the maximum space within which to run it.
In the pictures you can see the needlework stitched on the right side for the cover of the book and made basting the border to the maximum space.
Photo 3 / 3 Pic: 
Take the cardboard 2 mm. and place the boxes in this order: the central band 4x23 + 20x23 + 20x23 on (the longest side is always the height). Join them with the tape adhesive paper.
Take the 2 mm. Join Them cardboard and paper with the taper in this order: the 20x23 + 4x23 + the spin the 20x23. The Longer Side is always the height of the book.
Photo 4-6 / 4-6 Pic:


 Turn it upside down and on the extent not was then applied to the tape, glued to the sheet wadding for stuffing, use a few drops of glue qua e là, serve solo per non farla muovere. Ritagliate l'eventuale eccedenza.
Turn upside down (the side with the paper tape is now down) and paste the cotton in sheet for the padding . Apply some drop of glue, to not let it move. Cut off the possibile surplus.
Foto 7 / Pic 7 : 
Appoggiate il ricamo sull'ovattina...
Place the stitched linen on the cotton...
Photo 8 / 8 Pic: 
... then turn upside down, the basting as guidance for proper placement.
... then turn upside down. The basting will help you to place it Correctly.
Photo 9 / 9 Pic: 
Paste the linen that comes out from the side shorter.
Paste the redundant linen, start from the shorter side.
Photo 10-13 / 10-13 Pic:


 Once glued the short sides, before proceeding to also paste the long ones, cut the excess fabric in the corner, as shown, so as not to form lumps.
Now it inside, take advantage of this time to position l'esterno finito ora sotto un peso, in modo da far aderire per bene la colla.
You have just paste the shoter sides. Before you procede with the longer ones, cut the surplus fabric at the corner, at showed in the picture 10. So you'll not have lumps at the corners.
The outiside part of the book is finished. Place it under pression, it will help the glue to cohere the parts. Now, let's procede with the inner part.
Foto 14-18 / Pic 14-18 :


Place the cardboard 1 mm. on the fabric you chose for the interior, cut it to each board, leaving everyone around the fabric needed for turning (2.5 cm. on the side).
Place the 1 mm. Cardboards You Have Chosen on the fabric for the inner part. Each cut the fabric around cardboard, leaving the Necessary to turn it and cover (2.5 cm. For side).
Photo 19-21 / 19-21 Pic:


 Covered
individually the two larger boxes, following the wisdom of the angle.
Cover up the two bigger Cardboards, remember the trick about the cover.
Photo 22-26 / 22-26 Pic:


 Speech slightly different the central area: the cardboard glued to the fabric because of its length, and when turned over what it takes to finish, paste only the two short sides.
The covering of the spines is a little different. Apply the glue to the cardboard and paste it to the fabric. Now, turn the fabric to cover, past But only the shorter sides, Showed like.
Photo 27-29 / 27-29 Pic:


Retrieve the outside of the notebook that we had put in pressure, spread a layer of glue on the back of the central strip and place the head covered with the fabric facing up.
Recover the outside part of the book, to spread glue layer on the pins and place the inner part spice just covered. The fabric has to be inverted.
Photo 30-33 / 30-33 Pic:


 Now it's up to the other two coated paperboard : for these, a generous dose of glue to the exterior is coated for the cartoons, on the side of the box was discovered.
Now, it's time to apply the two Cardboards Remaining: to spread glue layer on Them Both and on the outside part of the book .
Photo 34-36 / 34-36 Pic:


Place the two boxes on the outside of the notebook, again with the fabric facing up, with delicacy and precision must be attached to the central belt. Press to adhere the glue. You will see that there will be a slight margin of a few millimeters from the outside of the notebook.
Place under a weight of the notebook lying for half an hour, so as to adhere and dry the glue.
Place carefully the cardboards on the outside part of the book, the fabric always upside. The inside panels have to be close fitting the spine. Push gently. You'll have a little margin (about 2 mm.) looking at outside part.
Place the splay book under pression for about a half an hour, in order to let the glue makes its work and dries.
Foto 37 / Pic 37 : 
A circa 4 mm. da bordo del pannello interno applicate la meccanica degli anelli con la rivettatrice, centrandola rispetto l'altezza e sul cartone che rappresenta la parte interna del retro del quaderno; la copertina will be on your left.
Apply the ring with the Riveter machinery, centering it and RESPECT the height at about 4 mm. to the inner margin of the inside panel.
You have to place it in the right side of the inside part, you'll Have The cover on the left side.
last Photo 38 / 38 last Pic: 
The book is finished, remember to remove the basting stitch embroidery.
linen
Your book is finished! Remember to remove the basting
on the cover.
 Making of a Ribbon trim
  To begin with you need 3 lengths of ribbon, usually I estimate about 2 metre lengths for a small hanging pillow so in total it would be 6 metres if you were doing it in all the same colour ribbon, make sure they are all seperate lengths. Next fasten the 3 lengths of ribbon to the bottom point (in this case is the heart point), I usually slip stitch this together.
 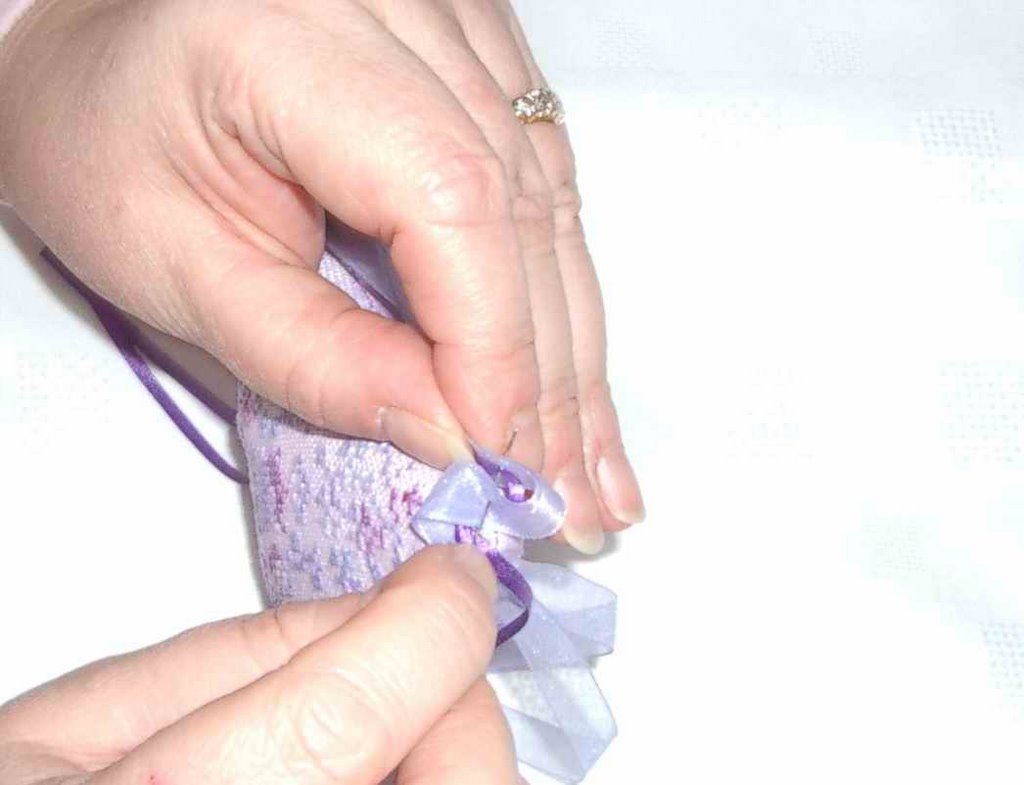 Now here I catch the ribbons with the needle and cotton to pushing the needle through the ribbon thickness.
  Then pull the thread Towards That you know the ribbon ruffles.
 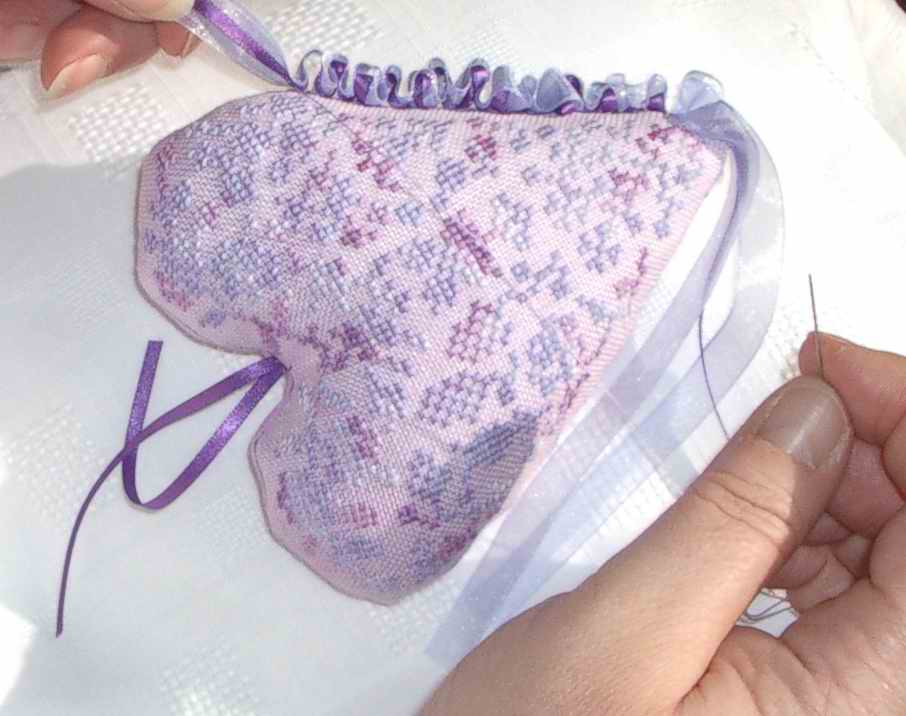 Then catch the fabric through the seams with this is about you needle 1 / 4 inch intervals as I go along, then catch the ribbon again, this is Usually about 1 inch intervals along the ribbon or However you prefer to close or the size of the ruffles.
 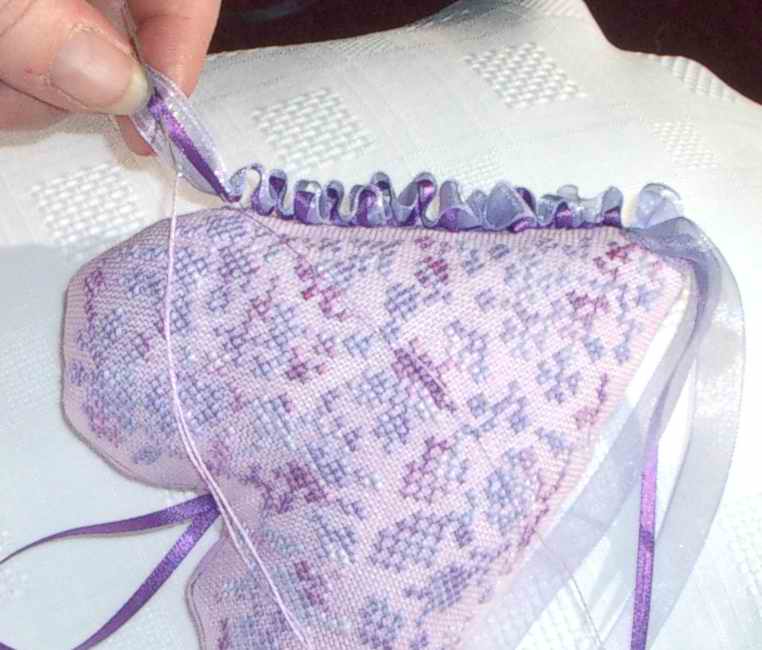 Continue threading the fabric along the seam
  You do this all the way around your pillow until you get back to Where You I started Altogether then catch the ribbons and make a slight knot with Them and fasten off, then trim the ribbons to length and You Have the finished project.
 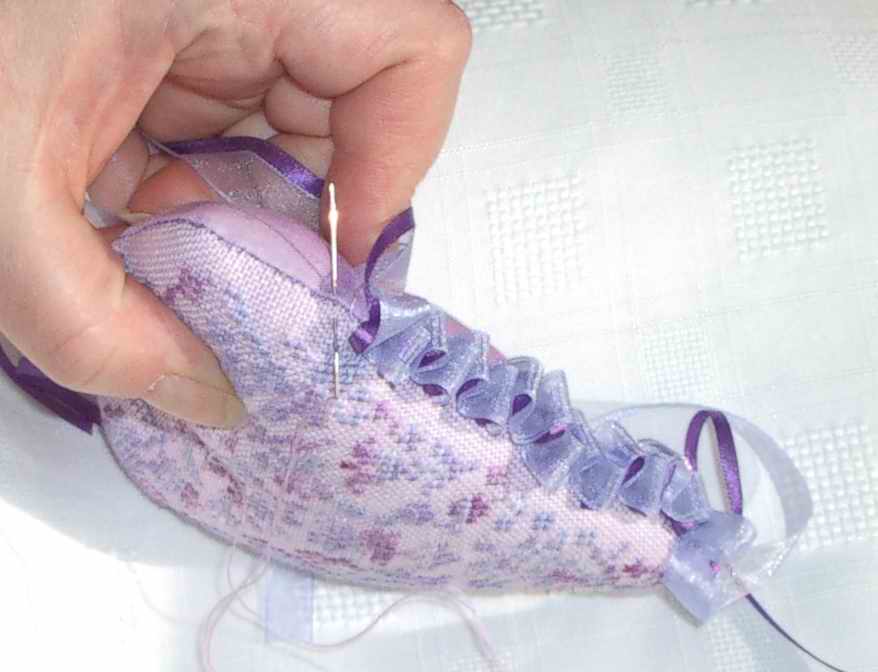 Continue this throughout the length of your


